Preview 1 Preview 2 Preview 3 Preview 4
1 2 3 4

Action Script Recognition

0 comments

Action script is a programming language, or better known as scripting in Flash. Action script can be placed on the keyframe, instances, or objects.
In the manufacture of Flash animation, action script is used to drive an instance or object, but it also can be used to adjust the appearance of a certain frame. Action script that we will learn is action script associated with the making of animated films.
To open the action script panel, click Window> Action or F9 in your keyboard.
Syntax of writing action script
    Action script has to understand the rules so that computers running the commands given. Examples of writing action script and its placement

    gotoAndStop(5); 
     
    If action script is written on the keyframe in the main stage action script is then target the main stage. If action script is written on the keyframe in the particular instance of the target is an instance.
    Such action script is written in the first frame the main stage, the action script is called for from the first frame immediately jumped to the fifth frame and stop at frame 5. Displayed on the screen when we do a test movie only picture on the screen that are in frame 5 only.
    car.gotoAndPlay(5);
     
    If action script is written on the keyframe in the main stage and on the main stage there are instances under the name "car", the target action script is an instance with the name "car" and the requested frame 5 is frame 5 which is the instance with the name of "car" instead of frame 5 contained the main stage.
Example of using action script in animation
  1. Open Flash
  2. Import car picture
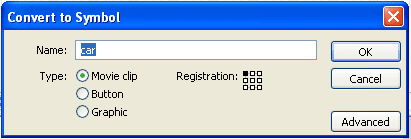
  3. Convert that picture to symbol (movieclip) and give a name "car"
  4. Also give name in the instance with name "car"
  5. Right click  in the first frame > choose Actions or F9 in your keyboard
  6. Type this action script :
    _root.onEnterFrame=function(){
        with(car){
            _x+=20;
        }
    }
  7. Play the animation/test movie (CTRL + ENTER). What happen??? Car will run to the right side of stage.
  8. This is the explanation of that action script :
    _root.onEnterFrame=function() : when the frame is run and then run the requested function
    with(car) : the action script target is an instance with name "car"
    _x+=20 : shift the target to the left as many as 20 points. If the value loaded is smaller, the target will     move more slowly. If the + is replaced with - then the object "car" will run to the left

WELL DONE !!! LET'S ANIMATE !!!

    read more

    Symbol, Library, and Instance

    0 comments

    Symbol
    Symbol is is the storage object in Flash. Symbol can be the object of drawing, animation, or button. Function of the symbol that is if we create an image / animation and then turn it into a symbol, then the images / animations will be stored in the library. Symbol can be used at any time and more than once in a way take it from the library. How to create a symbol ? There are 2 ways:
    • change the object into a symbol
    • create a new symbol
    Library

    Library is a place to store the symbol images, animation symbol, symbol keys, image import, imported sound and Quick Time movie. The library, we can see the name and type stored in it, whether imported or symbolic form. if we click one of the objects in it the image object will be visible in the preview box. Imported or symbol can be grouped into folders and sub folders. Name of a folder or object in the library can we change in a way to double-click on the folder or item you want us to change its name.


    Instance
    Each symbol that has been placed on the stage named instance. One symbol can be used for multiple instances. we can give the instance name is already on the stage by selecting an instance and open the Properties panel.


    read more

    Frame by Frame Animation

    0 comments


    Frame by frame animation is animation technique by replacing the images on each frame. Frame by frame animation has a size larger than tweened frame animation because more load many objects / pictures than tweened animation.
    Frame by frame animation is used when creating animated movement are complex and require more than one object / images to drive the animation. An example is an animated cartoon that talk. Mouth movement can be made with the object of cartoon frames.

    read more

    Timeline, Keyframe, and Layer

    0 comments

    Timeline, keyframe, and layer are important in Flash.
    1. Timeline : to show us the number of frames, frame length, and duration of the animation. Timeline also can show the animation process works, whether using a frame-by-frame animation or use the animation tweened
    2. Keyframe : key of each movement can be said motion animation or the beginning or end of each case of replacement of the image on the animation. Timeline can has more than one keyframe depending on the number of image objects is done
    3. Layer : likened to a stack of transparent paper. An animated scene can use more than one layer. we can add a layer in accordance with our wishes.
    There are 3 options for the layer, the settings are on the right side of the layer name :
    1. Show / Hide All Layers : show / hide the image layer objects on stage
    2. Lock / Unlock All Layers : lock / unlock the object image layer on a stage for non-editable
    3. Show All Layers as Outline : displays the object image as an outline in accordance with the icon color layer

      read more

      Know More about Flash and The Tools

      0 comments

      That's the first appearance of  Flash if we create a new document. It has 3 parts, Timeline, Toolbox, and Stage. These are the explanations :

      1. Timeline is section to see the length and time animation based on the number of frames.
      2. Toolbox is the tools used in the process of drawing and coloring in Flash.
      3. Stage is work area for drawing and the area to be seen if the images and animations have been made.
      Tools in the Toolbox
      The function of those tools are :
      1. Arrow and Subselect Tools : function selection picture
      2. Line : make line
      3. Lasso : selection of some of the images
      4. Pen : draw path
      5. Text : make texts
      6. Oval and Rectangle : make circle and box object
      7. Pencil and brush :to draw
      8. Free Transform : change object shape
      9. Fill Transform : change the direction of the gradient color object
      10. Ink and Bucket : coloring objects
      11. Dropper : take color from another object
      12. Eraser : delete object
      13. Hand : shift the work screen
      14. Zoom : enlarge and shrink the working screen
      15. Options : sub-options of the tools that are active 


      read more

      Tweened Animation

      0 comments

      Tweened animation is an animation technique that auto-frame animation as part driven by the computer. All you need do is to determine the initial image on the keyframe. Tweened animation used when we need a motion animation that is more suppressed in the shift of the object image. If there is another image object to be moved, then the object must be placed on another layer. There are two kinds of tweened animation techniques, namely motion tweening and motion guide.
      If you want to learn more about them, just click this link :
      1. Motion Tweening
      2. Motion Guide

      read more

      Motion Tweening

      0 comments

      Motion tweening is an animation technique animation tweened kind where we can change the location of the object image, large / small object images, color and rotation of the object image.
      Motion tweening using at least two keyframes, the first keyframe is used to determine the initial image object, while the final keyframe is used to determine changes in the final image object.
      In between the start and end keyframe to keyframe inserted extra-keyframe to change the image of different objects from the first keyframe and end keyframe.
      Let's practice together :


      1. Open your Flash > Create New Flash Document
      2. Create an object. We use a picture for this tutorial. You can create any object or insert picture from your computer.
      3. Insert frame until frame 30.
      4. Then, Create Motion Tween
      5. Insert keyframe in the last frame.
      6. Move your object. You can move it to anywhere, but still in the stage area.
      7. If you want to change the color, you can set it on the Properties after click the object. You can change the color just in the keyframe (first and end keyframe). Choose Color to change your color. In this tutorial, we choose Alpha.
      8. The, play your animation. You will see the changes that the object in the beginning was evident, while in the end will seem increasingly blurred

      read more

      Make Guide Animation

      1 comments


      Guide animation is animation which the object follow the flow like a line. We just make an object and add a motion guide layer for a line. Line can be shaped curve or straight line. Let's practice together :
      1. Open your Flash program 
      2. Click Create New Flash Document
      3. Make one abject. It's up to you. In this tutorial, we make a circle in the first layer.
      4. Then, create a new Add Motion Guide layer and place it on the first layer.
      5. Fill it with a shaped curve or straight line. If you wanna make a curve, you can make it from straight line, but you must pull down / up so that it can produce curvature. Don't forget to activate the magnetic sign "Snap to object"
      6. Insert frame until frame 25.
      7. Make a tween animation for the circle.
      8. Insert keyframe in the last frame of circle object.
      9. Move the circle to the last of your line. Use your keyboard keys Shift + right arrow and make sure that your circle  follow the path of line.
      10. Play your animation with CTRL + Enter.

      read more

      Our Templates Previews

      0 comments

      Those are some examples of our templates. We have some template designers. They can design and animate picture, text, etc. Those templates can be used for all tutorial. You can use them for all lesson which wanna be interactive medias. These are details of them :


      Template designer    : Nessya Alvioriza
      Subject matter          : Biological


      Template designer    : Yohannes Prihardana
      Subject matter           : Entrepreneurship


      Template designer    : Agus Setiawan
      Subject matter           : Geography


      Template designer    : Nazla Rizkiyani
      Subject matter           : Biological


      Template designer    : Eka Setyawati
      Subject matter           : Biological


      Template designer    : Muhammad Faizin
      Subject matter           : Geography

      Template designer    : Ainun Naim
      Subject matter           : Biological


      Template designer    : Kharis Sulistiyono
      Subject matter           : Geography


      Template designer    : Lukman Hakim
      Subject matter           : Electronics


      Template designer     : Lukman Hakim
      Content/animation     : Muhammad Faizin
      Subject matter           : Mathematics


      Template designer     : Mr. Agus Triarso
      Content/animation     : Muhammad Faizin
      Subject matter           : Automotive

      read more

      Techniques to create Storyboards

      0 comments

      Storyboard is a sketch of the film in the form of successive images. Storyboard made before entering into the motion portrayal of characters and animation films. Usability storyboard is as basic design object motion on the film.  If you want to make a good animation, you must prepare the storyboard before, because storyboard is the first and the main. Drawing storyboards can use pencil and paper or other media and then you must scan the picture with your scanner to give colors. You will also need some graphics software like Photoshop and others because you must trace that picture to make it into digital image.
      Important points that must be considered in making the storyboard are :

      1. Scene  :  number of scenes in storyboard
      2. Setting :  place or event story  
      3. Frame :  number of frames if animated 
      Storyboard should contain a detailed explanation of the animation to be created. Starting form frame name, frame number, simulation, animation description, and view details.
      That's all. Let you make the storyboard and give it to us. We will make it to interactive animations.

      read more


      Multimedia Pembelajaran Interaktif Berbasis Flash is proudly powered by Blogger.com | Template by Blog Zone